|

|

|
The carry handle, a retractable transport handle, consists of two metal rails at the machine’s base. It’s used to maneuver the machine and can be secured with either screws or pop rivets.
You can determine the fastener type by standing the machine upright and inspecting its base. Machines made before November 30, 2019, have pop rivets, while those manufactured on or after October 1, 2019, use screws.
Once determined, follow the appropriate instructions below.
Carry handle fixed by “Screws” – v1 and v2 machines
EQUIPMENT REQUIRED:
- Philips head screwdriver
PROCEDURE:
Please follow the steps below to replace the carry handle if it is secured by screws.
Step 1: Position the ball machine vertically upright.
Step 2: The carry handle is fixed to the base of the ball machine by four Philips head screws. Each screw will have a set of flat washers and spring washers, remove the screws using a Philips head screwdriver and set them aside.
Note: Depending on the machine’s production date, improved longer screws are used to hold the handle on the rear side.
Step 3: Remove the old handle and replace it with the new one in the same orientation.
Step 4: Place the spring washer and flat washer onto the screw respectively and then, using the Philips head screwdriver, fix the carry handle into place.
Step 5: Once you have all four screws securely in place, test that the handle slides freely. You have now successfully replaced your handle.
Here is a video showing you the above process of replacing a carry handle secured by screws.
Carry handle fixed by “Pop Rivets” – v1 machines only
EQUIPMENT REQUIRED:
- A drill with 4 mm High Speed Steel (HSS) drill bit
- A pop rivet gun or pop rivet drill attachment
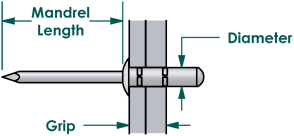
- Four 4 x 16 Aluminium pop rivets (Diameter: 4mm & Grip: 16mm)

PROCEDURE:
Please follow the steps below to replace the handle if it is secured by pop rivets. Make sure you equip yourself with the correct safety equipment such as safety goggles and gloves.
Step 1: To access the pop rivets, start by removing the outer purple body. Here is a video showing you how to remove the outer body:
Step 2: After removing the purple body, locate the 4 pop rivets which hold the carry handle in place. Use the drill with a 4 mm High Speed Steel (HSS) drill bit to remove the pop rivets.
Step 3: To remove the top 2 pop rivets near the top of the handle, you will drill through the pop rivet from the top of the machine. To remove the lower 2 pop rivets, you will drill through the pop rivet from under the machine which means you will need to turn the machine upside down to face the base. Please make sure the setup is stable before drilling.
Step 4: To replace the carry handle, place it in the correct orientation and put in one 4 x 16 aluminium pop rivet in each hole, going the same direction as they were previously. You can use a pop rivet gun or a drill attachment to install the pop rivets into the machine.
Step 5: Once you have all four pop rivets securely in place, test that the handle slides freely. You have now successfully replaced your handle.
Here is a video showing you the above process of replacing a carry handle secured by pop rivets.


